Showing posts with label recipe. Show all posts

17 November 2014

Pic's Peanut Butter Swirl Brownies

Oh My. Heavens.


This is a recipe I've made a couple of times now, and it's beyond amazing. I'm a huge fan of peanut butter and chocolate together (Hello! American here! Reese's Peanut Butter cups are still one of my favourites!) So, here is our Pic’s Peanut Butter Cook & Craft Challenge recipe!!

Pic's, our favourite PB here. It's "REALLY GOOD", but no, seriously, it is.

This is an adapted recipe I originally found in One More Slice, an amazing book with so many heart stopping sweet recipes! But here is my tweaked version.


Beat together the butter, sugar and vanilla until it's light and creamy. And check out the beautifulness of the melted butter and peanut butter!!! (drooooool)


Spread the brownie mixture in the parchment lined tin and put aside.


For the peanut butter cream, melt the butter in beat in the icing sugar, peanut butter, salt, and vanilla.


By the the time you finish this, it will have cooled enough to spoon or drizzle the peanut butter cream on top of the chocolate mixture. Using a knife, make swirls in the tin to make the marbled effect.

The perfect crisp brownie top... and a missing piece! Ooops!
Pop it in the middle of the oven for 30-40 minutes until the sides are firm and middle is set.
Let it cool and cut into squares. Devour.

Mmmmm Gooooey....


Henk's favourite part about Pic's? "STAR!!!!!"

Pic's Peanut Butter Swirl Brownies

Ingredients for the Brownies
  • 200 grams softened butter
  • 175 grams sugar
  • 1 tbsp vanilla extract
  • 50 grams cocoa powder
  • 50 ml rice syrup
  • 3 pinches sea salt
  • 4 free-range eggs
  • 90 grams plain flour
Ingredients for the Peanut Butter Cream
    • 50 grams butter
    • 65 grams icing sugar
    • 175 grams Pic's Peanut Butter (smooooooth for this recipe)
    • 2 pinches sea salt
    • 1 tsp vanilla extract
    Instructions
    1. Preheat oven to 180C (350F) and line a 20x20cm baking tray with parchment paper.
    2. Beat together the butter, sugar and vanilla until it's light and creamy.
    3. Mix in the cocoa, salt, and syrup.
    4. Add the eggs, one at a time, adding the flour last.
    5. Spread the brownie mixture in the parchment lined tin and put aside
    6. For the peanut butter cream, melt the butter and whisk in the icing sugar, peanut butter, salt, and vanilla.
    7. By the the time you finish this, the peanut butter cream will have cooled enough to spoon or drizzle on top of the chocolate mixture.
    8. Using a knife, make swirls in the tin to make the marbled effect.
    9. Pop it in the middle of the oven for 30-40 minutes until the sides are firm and middle is set.
    10. Let it cool and cut into squares.
    11. Devour.

    21 October 2014

    Cheese Straws - who knew?

    It always makes me slightly angry when I find simple recipes like this that I could have been making for ages! Way too easy, way too yummy, way too quickly eaten. The recipe I actually used was from the Treats from Little and Friday. (which of course I'm dying to go visit the cafe in Auckland.)


    Check out the book at least. There are so many great recipes.

    Good cheese and fresh herbs from the garden.

    Yes, I cheated. Store bought puff pastry.

    Messy twisties.

    And yummmmmm. Amazing warm out of the oven.

    Yummy for boys, and yummy puff pastry crumbs on the floor for Timmy.

    07 September 2014

    No-Bake Date and Almond Brownies

    The last few weeks we have been going through some chaos here at the homestead. Bathroom renovations are still going on, the house is covered in a layer of dust, the hallway is off limits for the boys, we've been going out and about EVERYDAY to stay out of the way of the tradies, and to top it all off, our oven stopped working. Luckily the grill and fan still work, so we've had to cook a lot with a curve and my bread and baking have all been on hold until we can get it fixed.

    Ugh.

    I was able to make a variation of some date bars that I posted on FB this week though.

    No-Bake Date and Almond Brownies!

    Way too easy, super yummy, everyone loves them! Like eeeeeveryone. Grown ups and kiddos alike.

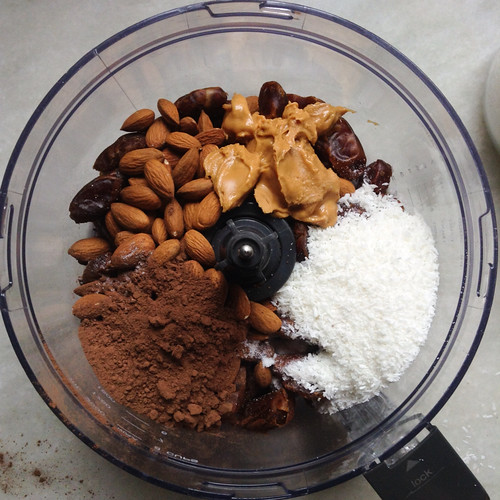
    It's as easy as putting all of the ingredients into the food processor and letting it work it's magic for about 5 minutes.


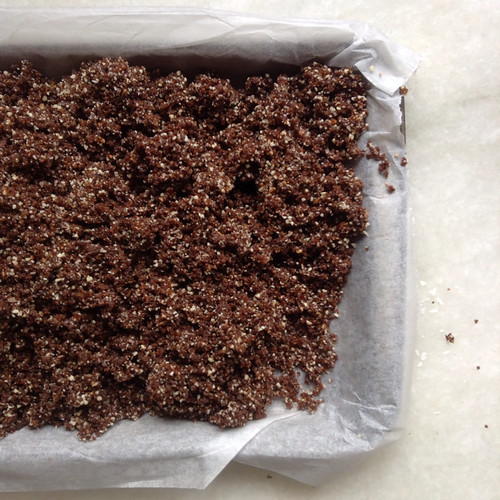
    Pour it out into a baking tin lined with parchment.

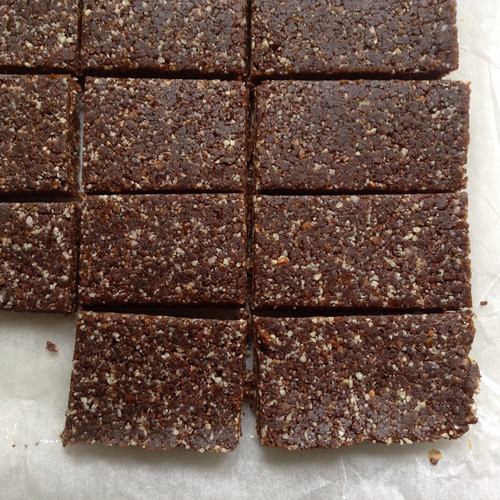
    Let it set in the fridge for 30 minutes or so and cut it up.

    Make sure you keep it in fridge to the freezer, it keeps it nicely set.

    Ingredients :

    • 2 cups pitted dates
    • 3/4 cup natural almonds
    • 1/4 cup peanut butter
    • 1/2 cup shredded coconut
    • 2 tbsp cocoa powder
    • A pinch of salt

    Method :


    1. Place all the ingredients into the food processor.
    2. Blitz for at least five minutes. It will be a bumpy ride at first but once that's done, let the machine do it's thing.
    3. Once it starts to look like nice wet potting soil, empty into a parchment lined smallish baking tray.
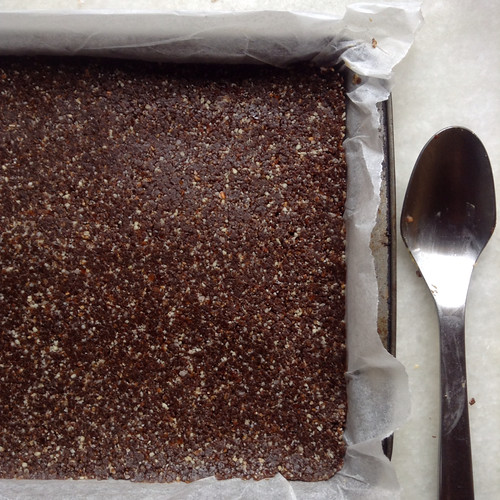
    4. Spread it out and press it firmly down with the back of a spoon and smooth it out as you go.
    5. Place in the fridge for a least 30 minutes.
    6. Take it out of the fridge and slice.
    7. Store in an airtight container in the fridge.

    Enjoy and love the peanut buttery goodness!


    14 August 2014

    Muesli Bars with Coconut Oil {Kid Cooking}

    These are something I make quite often. I found the original recipe here when I was just starting out Baby Led Weaning and solids with the boys. They are nice little afternoon tea snacks and yes, there is a bit of sugar in them, it's not ALL bad. Besides, I think Jacob and I eat most of them! 

    The last batch of these I made, I had some handsome help in the kitchen! 

    Here is our latest version of them!

    The Always Keen to Help Hendrik. 
    Preheat your oven to 180C and line a baking tray, 20x25cm, with parchment paper.

    Place all of the dry ingredients into a big bowl and mix to combine. The key is to have 3 cups of a mix of oats, fruit, nuts etc. We use our favourite muesli from Moore Wilson's that has oats, almonds, papaya, raisins, and such. Then we add in anything else we like. 

    Melt the coconut oil and golden syrup, it doesn't combine as well as butter, but still does the trick in the long run. 

    Pour the syrup mixture into the dry bits bowl and stir to combine. Pour it all into the baking tray and pop in the oven. 

    Bake for about 20 minutes. Take it out of the oven and let it cool completely before cutting. This is the hardest part, especially if Jacob's around to sneak a few nibbles off.

    We leave it in a airtight container in the pantry, I wouldn't know HOW long it would last, as it's usually gone in a couple of days. 

    H & W proud of their efforts.


    print recipe

    Muesli Bars with Coconut Oil
    Ingredients
    • 125 grams coconut oil
    • 1/4 cup golden syrup
    • 1 1/2 cup rolled oats, or we use our favourite muesli
    • 1/2 cup dried cranberries
    • 1/2 cup pumpkin seeds (pepitas)
    • 1/2 cup sunflower seeds
    • 1/2 cup self raising flour
    • 1/2 cup brown sugar
    Instructions

    1. Preheat your oven to 180C and line a baking tray, 20x25cm, with parchment paper. 
    2. Place all of the dry ingredients into a big bowl and mix to combine. 
    3. Melt the coconut oil and golden syrup in a saucepan. 
    4. Pour the syrup mixture into the dry bits bowl and stir to combine. 
    5. Pour it all into the baking tray and press it down and into the corners of the tray and pop in the oven. 
    6. Bake for 20 minutes. 
    7. Take it out of the oven and let it cool completely before cutting.
    Details
    Prep time: Cook time: Total time: Yield:

    11 August 2014

    Couscous Fritters {Leftover Makeovers}

    I'm discovering a passion for using leftovers. Even when I am cooking something, I am thinking about what I'll be able to make that last uneaten portion into. Frugality at it's best I like to think. 

    Last week, Jacob made some lamb and couscous for dinner. The lamb was perfect. So was the couscous. But there was a lot of it! He had made it with a mix of onions, garlic, silverbeet and currants. So yummy!

    The next day, I had over a cup leftover in the fridge. So, I did what people tend to do with quinoa and such, Fritters!
    The boy friendly lunch.
    Couscous Fritters, baby cos lettuce with carrot 'slaw' and blackcurrant jam for dipping.
    If you know how to make fritters, you can really make them from anything. Potatoes, kumara, mixed veggies, lentils, beans beans and more beans. It's all a bit to easy not to try. 

    First, whisk the egg then mix in your couscous. Add in the breadcrumbs slowly, a little at a time and mix. You may need less or more depending on the texture of the couscous and what is in it already if you are using leftovers. 


    Add in the feta and let it crumble a bit and keep some pretty chunky. I love the texture of big bits of melted feta. Next, you want to be able to make them into balls with your hands and have them stay together. If this isn't happening and it's still too wet, add more breadcrumbs.


    Heat up the pan with a bit of oil. I used regular canola oil for this one, but tend to do grapeseed oil when frying. Pop them into the pan and let them brown a little bit and then turn them and flatten a bit with a fork or a spatula. 


    They should be browned a bit on each side, it's just the egg you need to make sure cooks through, so it usually won't take any longer than 4-5 minutes on each side. 

    Drain them on a paper towel and serve 'em up! I was secretly hoping the boys wouldn't like them so I could have the whole lot, but no such luck. They were, sadly, a hit. 


    print recipe

    Couscous Fritters
    Ingredients
    • 250 g (about a cup) cooked couscous, inc any yummy bits and pieces
    • 1/2 to 1 cup breadcrumbs
    • 1 egg, lightly beaten
    • 2-3 tbsp crumbly feta
    • 1/4 cup canola or grapeseed oil
    Instructions

    1. First, whisk the egg then mix in your couscous. 
    2. Add in the breadcrumbs slowly, a little at a time and mix. You may need less or more depending on the texture of the couscous and what is in it already if you are using leftovers. 
    3. Add in the feta and let it crumble a bit and keep some pretty chunky. 
    4. You want to be able to make them into balls with your hands and have them stay together. If this isn't happening and it's still too wet, add more breadcrumbs.
    5. Heat up the pan with a bit of oil. I used regular canola oil for this one, but tend to do grapeseed oil when frying. Pop them into the pan and let them brown a little bit and then turn them and flatten a bit with a fork or a spatula. 
    6. They should be browned a bit on each side, it's just the egg you need to make sure cooks through, so it usually won't take any longer than 4-5 minutes on each side. 
    7.  Drain them on a paper towel and serve 'em up!
    Details
    Prep time: Cook time: Total time: Yield: approx 8 fritters

    09 August 2014

    A Week of Toddler Lunches

    I wanted to document what we are having for lunch lately. It's been a pretty awesome change over the last year. There is something so cool about when your kids start eating "people" food. Or grown up food. Or at least a variation of it. Here is what they had last week ...

    Tuna Melt on Vogel's Bread with baby cos and capsicum.
    Hard boiled egg, hummus, carrot and capsicum, and an apple.
    Couscous Fritters, baby cos lettuce and carrot 'slaw' with balsamic, and blackcurrant jam
    Curry Kumara Puffs, pear, mixed beans and lettuce
    *Mousetraps, mandarin, edamame, and mixed beans
    Please note the *. This was a very, very special meal. The mousetraps were made by the boys. Mostly. They spread the vegemite on the bread with actual knives, placed the cheese on top, and only ate a few bits of it. They were so interested and excited when I took them out of the oven! It made my day! Also, this was their first day with edamame in their pods. They loved it! It was a bit of a challenge at first, but even today, Willem had the technique down pat! Totally aced it! 

    I love that they are so keen to help and watch what is going on in the kitchen. I never remember being that excited, but then again, when I met met Jacob, the only thing I could cook was pasta and red sauce. True story. 

    The more I involve them, the more interested they are. The mousetrap making was just awesome to watch. They are naturals in the kitchen! 

    xx

    04 August 2014

    Fish Fingers and Trying Fighting School Holiday Boredom....

    This past school holidays were slowly driving me a bit mental. It rained. It was cold. There were next to no playgroups and it was too crappy to go out anyway. So what did we do?

    Yes. Yes. Yes.

    Made Fish Fingers. 

    I know. I know. 

    Its the bane of so many mum's existence. But honestly, we never have them! So, it quite was a treat! 

    We used about 400 grams of fish (I think it was groper) cut into easy to manage strips. 
    Put it into a bag with 1/2 cup of flour. Shake it baby! (the boys loved this for about 5 seconds)
    In a bowl, I combined equal parts shredded coconut and panko breadcrumbs with a little salt and pepper. Then (without egg, crazy I know!) put the coated fish into the coconut mixture. Press them in thoroughly and make sure it all sticks. It's easiest to do this in batches. Then in a shallow fry pan using grapeseed oil, fry them up until they are golden brown and cooked through. Drain on a towel and squeeze a bit of lime, good to go!


    And while this was all going on, I was baking some chips in the oven and making some of my favourite tartar sauce via my childhood memory. I felt like a true mum (or Mom) when I made that. 
    Mayo. Relish. Stir. 
    It brought a tear to my eye and made desperately miss my Mom back in the states. 
    It was a total 80's flashback lunch for me.
    And the boys loved it. Especially the tartar sauce. 


    Coconut Fish Fingers with Mom's Old School Tartar Sauce


    Prep time: 10 mins
    Cook time: 10 mins
    Total time: 20 mins
    Ingredients
    • 400 grams Groper (or any other hardy fish)
    • 1/2 cup flour
    • 1/2 cup desiccated coconut
    • 1/2 cup panko breadcrumbs
    • approx 1/3 cup grapeseed oil for frying
    • 2 tbsp mayonaisse
    • 2 tbsp gherkin relish
    • a squeeze of lime
    Cooking Directions
    1. Cut the fish into easy to manage strips.
    2. Put the fish strips into a bag with 1/2 cup of flour. Shake shake shake!
    3. In a bowl, combine the coconut and panko breadcrumbs with a little salt and pepper.
    4. Then put the coated fish into the coconut mixture.
    5. Press them in thoroughly and make sure it all sticks. It's easiest to do this in batches.
    6. In a shallow fry pan using grapeseed oil, fry them up until they are golden brown and cooked through.
    7. Drain on a towel and squeeze a bit of lime, good to go!
    8. Mix the mayo and relish together and serve on the side for yummy dipping action.


    xx

    02 August 2014

    Curry Kumara Puffs - More Freezer Fare! {Leftover Makeovers}

    "Snacks!" demanded two crazy wee boys. "Snacks!!!" they yelled again. It was actually time for lunch, but they never yell for lunch. Snack. Snack. Snack! Always a snack. And in my head, I hear "Milk! Milk for the morning cake!" Ugh. Too many kids books!

    For these two little men, food is something that must be consumed at all times. There is always a cracker stashed somewhere in the house. Raisins find their way out of books and into their mouths if they are denied a fourth helping of dates. I know they are growing boys (growing like mushrooms according to our 90 year old neighbour) but the consumption levels are incredible. "Astounding!" said the Gruffalo.

    I hate throwing away food, and luckily most days there is little that goes to waste. But once in the while, there is a bit of leftover curry or bolognese or roasted potatoes. They get thrown in the fridge or the freezer for tomorrow's lunch for me or... A leftover makeover! (Que the cheezy music and the fancy intro.)


    So. Seriously. Veggie Korma. What to do, what to do... Pasties. Pies. Puffs. Samosas. Call them what you want. Well, this version, we call them Curry Kumara Puffs. There was maybe about a half-cup to a cup of korma left over from the night before. So, hello kumara!


    We baked a couple kumara (or you can use regular sweet potato, or not sweet potato) for an hour and then let them cool down. You could peel and cook them in a pot I guess, but baking them is a nice "leave it and play with the boys" way of cooking. Once they are cooled, take off the skins and mash them all together with your leftover korma.


    While this was tasty on its own, don't eat it all!
    Next, roll out some shortcut pastry. You can use the store bought stuff, which I did here, or you can easily make your own. Roll it out until you have a nice thickness, about 5mm or so. Then using a bowl or a big cup that is about 10-12 cm in diameter, trace or press through the pastry to make your circles. Keep doing this and then re-rolling until you've used all of you pastry. 

    Now - fill it! I used about a tablespoon and a half in each pastry circle, but use your best judgement with the amount the leftovers you have. Plop it on one half of the pastry and then with a wet finger, dampen the edges of the circles. Carefully fold over and press the edges together. I used a fork to make some silly edges as you can see, but they barely ended up noticable once they were cooked. 


    Brush them with some beaten egg and put them into a preheated oven, 200C for about 25 minutes or so. 


    Pretty awesome. I put them in the freezer on the baking tray after they cooled a bit. After they were nicely frozen, I then put them into a freezer bag. The boys love them. I love them. Before I go to bed, I take a few out of the freezer, leave them in the fridge and after we get back from an outing before lunch, I put them under the grill for about 15 minutes to warm them through. 

    Pretty damn tasty. But I'm a sure for carbs and fluffy crispy pastry!

    xx

    27 June 2014

    Persimmon Bundt Cake (and an almost Beetroot Gnocchi.)

    The last few weeks have been a bit crazy.
    Crazy running and jumping boys.
    Me with food poisoning. Bad enough to send me to the doctor finally...
    J working multiple weekend nights in a row.
    We all need a break.

    On top of trying to stay on top of life, I've been trying new recipes here and there... One still needing a bit of work is Beetroot Gnocchi, or rather I have a boatload of leftover roast veggie-gnocchi. They were ok. But just ok. I'm still working on those. I'll get there damn it!


    But this one was a winner! We had a few persimmon kicking around in the fridge recently and while I was thinking of a way to use them as a chutney or something, I ended busting out the old bundt cake mould. I hadn't used it in ages and they always make some pretty cakes. I need to start using them more often. 

    So this treat was first found here.


    I made it minus the currants, which I just forgot (that happens a lot lately, they were sitting on the bench and all! Ugh.) and minus the nuts as you never know who might have a nut allergy these days. 

    It's a pretty basic recipe really. Very similar to a pumpkin cake which is always a happy treat for me!

    xoxo

    29 May 2014

    Holy Winter! Where's the playdough!?

    Ok ok. I know it's not THAT cold - or rather what cold used to be. Living in Minnesota for the better part of 8 or 9 years makes you hard. But winter here in Wellington just makes you grumpy. It's still cold. There is rain. 100k+ wind gusts. Almost freezing temperatures. But never cold enough to snow! At least seeing snow would make it alllllll worth it. 

    We've all been trying to keep busy. Playgroups. Baking. Trying to evade those cold grumpy moments. And as we try to find new and fun things to do, my new favourite recipe for the boys is...

    PLAYDOUGH. LOTS AND LOTS OF PLAYDOUGH.

    Both Hendrik and Willem have been requested "plydu" every day since I made this first batch. It's one of those recipes that make you wonder why anyone would ever have a want to buy it in the shop. Easy. I got it at one of my new most visited blog/sites, The Artful Parent. You can find the recipe here.

    It's so scary that these little men will be 18 months old in a couple weeks! Amazing. I remember seeing other kids at 18 months, thinking "I CAN'T WAIT!!!" And honestly, it's better than I ever imagined. Even with the newly found screaming and running and temper tantrums, watching them at this stage and all of the cuddles are truly amazing. 

    Hendrik. Eating. Wanting cumr (camera). Watching birds. Eating.
    Willem and his new favourite word, Helloooo. Getting upset. Getting more upset. Getting REALLY upset.
    But they love each other. Cuddles and hi-fives on request.
    And in case playdough, markers, toys, snacks, etc etc... Balloons. Always balloons. *pop*

    With Love,
    vH
    x